How to install your smart thermostat
Smart thermostats are a fantastic tool for conserving energy and money. They can instantly adjust the temperature based on your schedule, and you can use your phone to manage them from anywhere.
An added benefit: Smart thermostats are simple to install. In reality, you can do it yourself in less than an hour.
Here are step-by-step installation guides for 2 popular smart thermostats: the ecobee SmartThermostat with voice control and the Google Nest Learning Thermostat.
ecobee SmartThermostat with voice control
1. Make sure you have a Wi-Fi network connected to the web.
2. Gather all the tools youll require:
A power drill with a 3/16-inch drill bit
Little flathead screwdriver
Phillips screwdriver
Hammer
Pencil
Wire stripper
3. Ensure your heating and/or cooling system is working correctly before you begin.
Go to your homes breaker box and switch off the switch that manages the power to your heating and cooling system.
If essential, you can likewise switch off the main power switch at the breaker box.
4. Make sure youve switched off the best breaker by altering the temperature level with your existing thermostat. Wait a few minutes to make certain your system does not turn on.
5. Eliminate the front cover from your existing thermostat and check the type of system you have.
6. Examine if your old thermostats backplate has L1 and L2 wires (i.e., wires for incoming line power); has a “Warning: High Voltage” image; or is labeled 110, 120 or 240 volts.
If any of these conditions exist, you have a high-voltage system, which is not suitable with the ecobee SmartThermostat with voice control.
Do not connect an ecobee SmartThermostat with voice control to this high-voltage system.
You can also carry out a compatibility examine ecobees site.
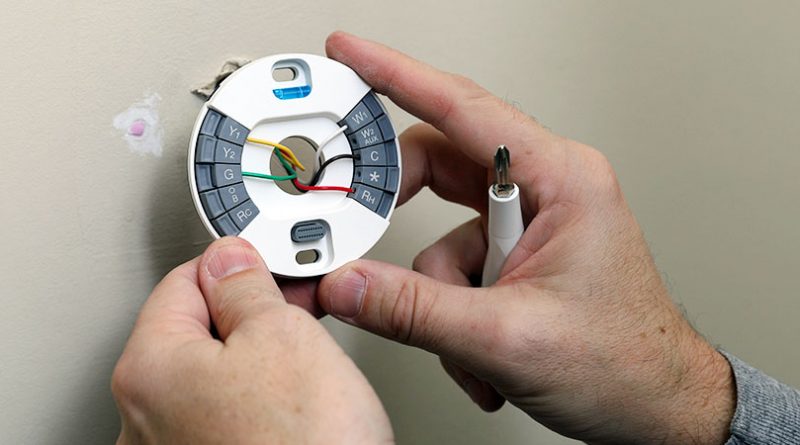
7. Take an image of the wires linked to the terminals of your existing thermostat for future referral.
8. Inspect to see if you have a C wire (also called a common wire), which makes it possible for the continuous circulation of 24VAC power that ecobee thermostats need to operate.
If you do not, you will need the Power Extender Kit included in the ecobee SmartThermostat box.
9. Thoroughly disconnect and label the wires from your old thermostat one at a time, using the labels provided.
10. Unscrew the mounting plate of your old thermostat to eliminate it from the wall.
11. If you choose to use the trim plate with your SmartThermostat (its useful if you desire to conceal holes or marks left on the wall by your old thermostat), align the installing holes on the trim plate and brand-new backplate and after that press them into location together.
12. Pull the wires through the hole in the middle of the backplate and attach the backplate to the wall using the provided drywall anchors and screws.
13. Insert your R wire or wires (i.e., your cooling and heating system power wire or wires) into the Rc terminal.
14. Place your remaining wires into the side (not the front) of their matching terminal blocks.
15. Tug on the wires carefully to guarantee they are firmly connected.
16. Carefully push any excess wires back into the hole and ensure there are no drafts originating from the hole( s) in the wall.
17. Gently press your SmartThermostat into the backplate up until it clicks into location.
18. Turn the power to your heating and/or cooling system back on using the master switch or at the breaker box.
19. Follow the directions on your SmartThermostat screen to finish the setup and registration procedure.
Google Nest Learning Thermostat
1. Ensure you have a Wi-Fi network connected to the internet, as well as the Google Home app set up on your phone.
2. Gather all the tools youll need:
No. 2 Phillips screwdriver
Flathead screwdriver
Power drill (optional).
Pliers and wire strippers (optional).
Flashlight (optional).
Nest Thermostat Trim Kit (optional).
3. Open the Google Home app and tap the “Add” button.
4. Tap “Set up device,” tap “Set up brand-new devices in your home” and select your home.
5. When you see “What are you setting up?” tap “Thermostat.”.
6. Scan the QR code on the back of your Nest.
7. Guarantee your heating and/or cooling system is working correctly before you begin.
Go to your houses breaker box and switch off the switch that manages the power to your heating and cooling system.
If necessary, you can also turn off the primary power switch at the breaker box.
8. Make certain youve turned off the ideal breaker by changing the temperature with your present thermostat. Wait a few minutes to ensure your system does not switch on.
9. Follow the actions in the app to eliminate the front of your thermostat and examine the kind of system you have.
10. Utilize your phone to take a photo of the wires for future referral.
11. Inspect if your thermostat is connected to thick wires with wire nuts or is labeled 110, 120 or 240 volts.
If either of these conditions exist, you have a high-voltage system, which is not suitable with Nest Thermostats.
Do not link a Nest Thermostat to these high-voltage wires.
12. If your system is compatible, tap “Not high voltage.”.
13. If you acquired a Trim Kit to cover any imperfections on the wall arising from removing your old thermostat, install it now– prior to you install your thermostat. Simply tap “I have a Trim Kit” and follow the app directions.
14. Prior to setting up the base plate, double-check to make sure the power is off.
15. Connect the base plate and connect the wires, making sure the adapter button remains down after inserting each wire.
16. Remove the battery tab from the back of the display screen.
17. Position the screen with the Google logo right-side up and push it onto the base until you hear a click.
18. Now go to the breaker and turn the power back on.
19. Select your language and follow the staying app steps to finish configuring your Nest.
For more information about the features of various clever thermostat brands, visit our site.
Disclaimer: Energy Trust of Oregon is supplying this info to make smart thermostat self-installations easier. The success of the setup is contingent on the customer, not Energy Trust. If you have any questions or concerns throughout the setup, you should call the thermostat producer or a certified professional.
Google Nest Learning Thermostat, the Google Play Music icon and Google Nest are hallmarks of Google LLC.
Make sure youve turned off the best breaker by changing the temperature level with your existing thermostat. Make sure youve turned off the right breaker by altering the temperature level with your existing thermostat. If you bought a Trim Kit to cover any flaws on the wall resulting from removing your old thermostat, install it now– prior to you install your thermostat. Disclaimer: Energy Trust of Oregon is providing this details to make wise thermostat self-installations simpler. You must contact the thermostat manufacturer or a qualified professional if you have any concerns or problems during the setup.